May 8, 2017
Keeping Shop
There is a recurring villain in the Terry Pratchett novels called The Auditors. They show up over a number of books as the adversary of Death, and make one of their most daring ploys in Thief of Time, which I also consider in the top five of the Discworld canon.
The Audtiors, who I describe in the singular because it thinks of itself as one entity, is one of the most insidious adversaries in the Discworld because it is not evil, or even mean-spirited. It simply wishes there was more order to the universe, and would prefer all life to stop because life is so disorderly.
One of the best descriptions for the existance of The Auditors begins thusly:
Nine-tenths of the universe is the knowledge of the position and direction of everything in the other tenth. Every atom has its biography, every star its file, every chemical exchange its equivalent of the inspector with a clipboard. It is unaccounted for because it is doing the accounting for the rest of it, and you cannot see the back of your own head.
Nine-tenths of the universe, in fact, is paperwork.
This phrasing has stuck with me recently in regards to critique of the internet and online communities. In many ways, the internet is its own auditor, its own bookeeper, its existance is the record of its existance. And yet, thousands upon millions of words have been written explaining more about the communities and worlds that make up the internet. Entire libraries could be filled with the printed pages of digital commentary on Twitter and Facebook and all manner of internet forum that have come before.
One of those pieces of internet critique, which I will not link to because I do not wish to drive traffic to it, rankled me, to the point where I felt a need to counter it. But to counter it properly, we need to establish some background. Carl Sagan once said “If you wish to make an apple pie from scratch, you must first invent the universe.”
And so must we, but the universe we’re inventing is The Fediverse, specifically one small corner of it called The Wandering Shop. This is the story of how The Wandering Shop came to be.
Twitter is awful. This is the sentinment that so many of us, myself included, have felt in the past months and years. It’s product decisions are opaque, it’s community vascillates between cynicism and bigotry on a daily basis, and you can never shake the feeling that you’re trying to have an intimate conversation while yelling at the top of your lungs in the public square.
Enter Mastodon, a piece of Open Source software (which in this case, as in most cases of Open Source, means software anyone can edit and everyone has opinions about which they’ll happily go to the barricades for). Mastodon has it’s own fascinating and complex history, involving multiple internet generations of Open Source and Free Software activists, but it is, in essence, a piece of software that behaves much like Twitter that you can host yourself. This definition is untrue by almost every measure, but it aids wonderfully in understanding.
Two crucial facts about Mastodon are true, and possibly beautiful, making them True again: 1) You can host it yourself, meaning you have full ultimate control over the canonical copy of the data. 2) Anyone who joins your instance, your little slice of the network of servers, is subject to your rules, and your community decisions.
One of the things that Twitter got wrong, in my opinion and the opinion of other heavy Twitter users, is that it thought the only way to grow and to have a userbase committed enough to fill the gaping maw of Venture Capital was to allow free speech to be the default. It’s truly mind-boggling how, when unfettered free speech isn’t allowed in the classroom, the workplace, on public television or radio, or in most human relationships, the developers of communication tools for humans think that free speech with no rules (or poorly enforced rules, amounting to the same thing) will prompt quality conversations.
Mastodon, from the outset, made no bones of the fact that the owners of the instances could mute or block or kick off individuals who broke that instance’s community guidelines. They could even block or mute whole other servers, allowing the instance owners to set their own rules and sanctions.
This is what interested me, when I first read the post from Eugen Rochko that kicked off Mastodon for most of us. I joined immediately, and loved the growing community I found there. Mastodon replaced Twitter in my life so quickly that at times it almost felt like whiplash. My fingers would reach to open Twitter of their own accord, and when my mind returned from wherever it had been I would realize what I was doing, close Twitter, and open Mastodon.
I’m forever grateful to that muscle memory, however, because without it the Wandering Shop would not be. It was during one of those brief unconscious Twitter checks that I saw my friend Annalee suggesting the idea of a moderated Scifi/Fantasy Mastodon instance. You can still see the thread here. We got to chatting, first over Twitter, then over email, and days later The Wandering shop was born.
As you can see from that thread, a strong Code of Conduct was part of the Shop’s DNA from the beginning. Many of us, myself included, feel like The Wandering Shop is a real, shared coffee shop that happens to mainly exist in our minds, and so it makes sense to me to say that the guidelines and code of conduct are built into the very walls of the Shop.
Annalee and I wanted to build a community that was open to all, but deliberate in what was and was not acceptable behavior. To the best of my knowledge, we have yet to act on poor behavior from the Shop’s patrons (those who have registered their accounts at The Wandering Shop), but we have muted or blocked accounts and instances that we thought were making life in the Shop worse. Additionally, we’ve put effort into deliberate community building. We made a weekly calendar to encourage conversations, and we try to generally be available as part of the community.
This is, for me, the power of Mastodon, when run deliberately: You can build online communities like neighborhoods, full of people you enjoy sharing the sunset with, and still be connected to the rest of the city down the road. I can honestly say The Wandering Shop is in the top three online communities I’ve ever been a part of. Twitter and Facebook don’t even make top ten.
The article that came out today, that fired me up enough to write this piece, was describing why an instance admin was shutting down his Mastodon instance.
I’m paraphrasing here, but the gist was: “I set up my instance as a place with no rules, where anyone could come and be who they wanted to be, and say what they wanted to say. I was stunned and saddened at the abuse and horrific imagery I had to encounter when dealing with this instance, and so I am shutting it down before it gets me in real trouble.”
There is a part of me, a small part, that is always reaching out to connect with other human beings. I don’t think anyone could try so hard to start online communities and not have a portion of yearning in that direction. I feel for this man, who tried and experiment and had it go so wrong.
But mostly I look at what is possible when thoughtful care and attention is taken towards creating a deliberate community, and a spark goes off behind my eyes. I think of the world we’re building at The Wandering Shop, and compare it to this person’s dismissal of the whole concept, and that spark quickly becomes the heart of a forge.
At the XOXO Festival in 2015, Eric Meyer spoke about building the kinds of online communities we want to live in. We’re trying to build a deliberate community at The Wandering Shop. I hope you’ll join us, if you feel so inclined.
You can support The Wandering Shop by donating to our Patreon.
twitter
books
wandering-shop
June 7, 2016
My Open Source Workflow
I think people have an impression that I make lots of contributions to Open Source (only recently true), and that therefore I am a master of navigating the steps contributing to Open Source requires (not at all true).
Contributing to Open Source can be hard. Yes, even if you’ve done it for a while. Yes, even if you have people willing to help and support you. If someone tries to tell you that contributing is easy, they’re forgetting the experience they’ve gained that now makes it easy for them.
After much trial and error, I have arrived at a workflow that works for me, which I’m documenting here in the hopes that it’s useful for others and in case I ever forget it.
Let’s say you want to contribute to BeeWare’s Batavia project, and you already have a change in mind. First you need to get a copy of the code.
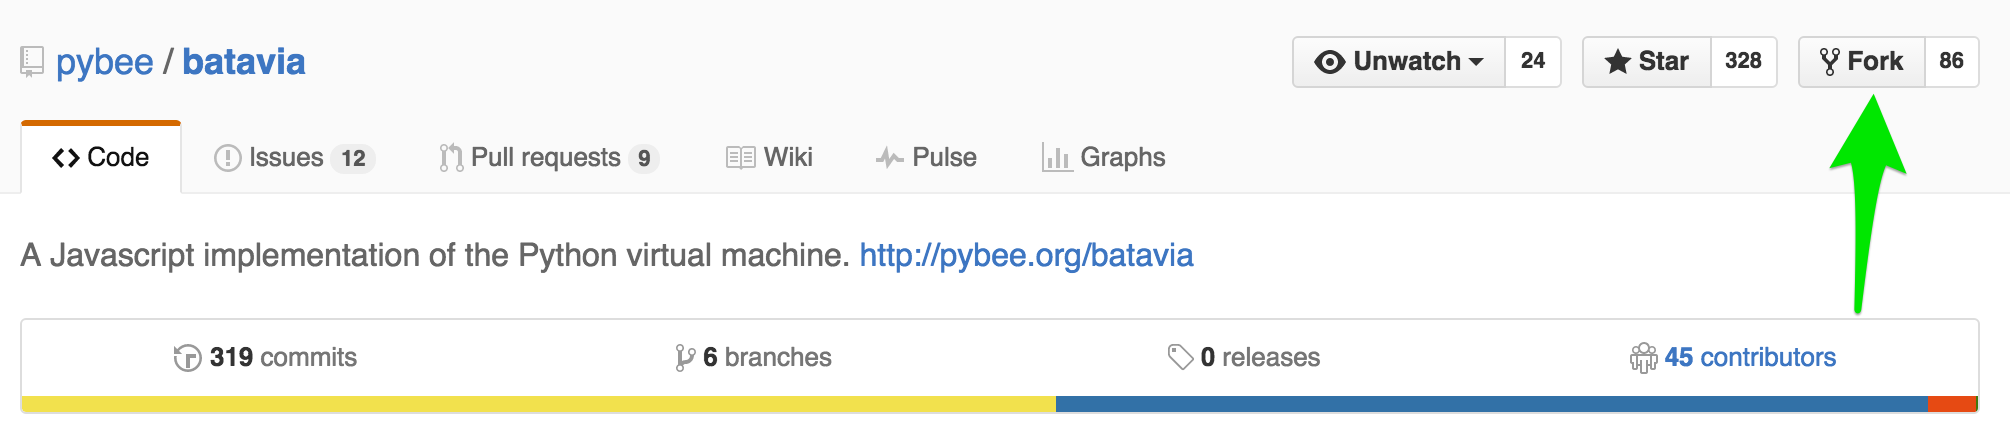
I usually start by forking the repository (or “repo”) to my own account. “Forking” makes a new repo which is a copy of the original repo. Once you fork a repo, you won’t get any more changes from the original repo, unless you ask for them specifically (more on that later).
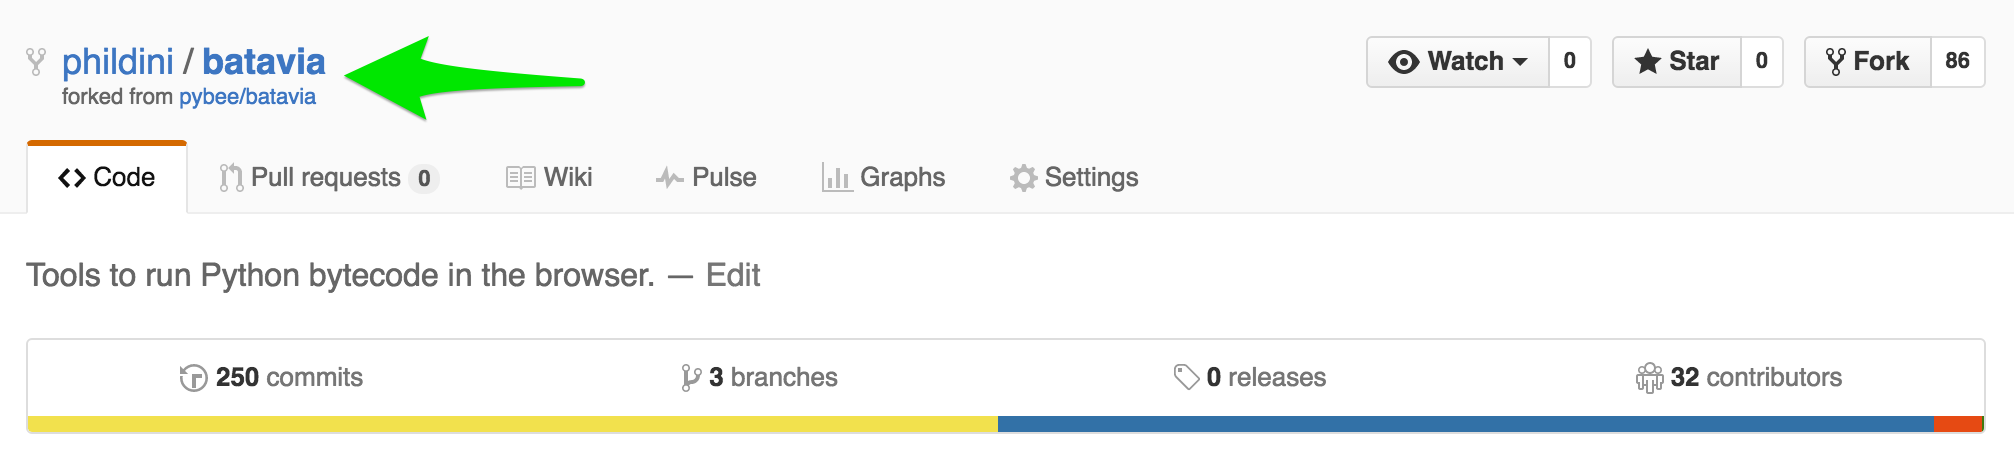
Now I have my own copy of the batavia repo (note the phildini/batavia instead of pybee/batavia)
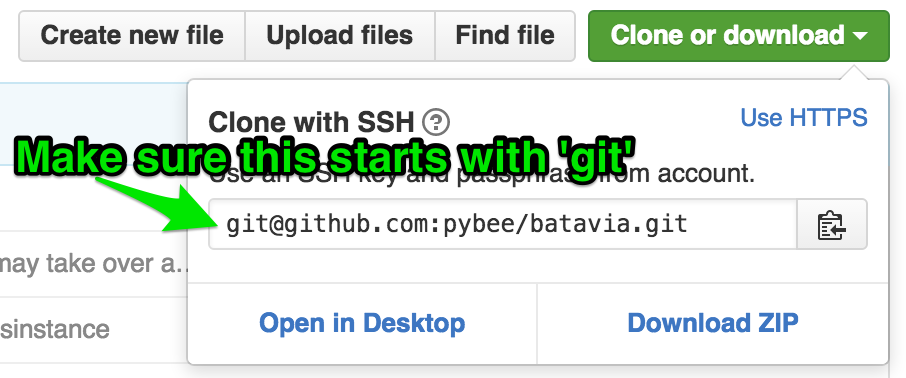
To get the code onto my local machine so I can start working with it, I open a terminal, and go to the directory where I want to code to live. As an example, I have a “Repos” directory where I’ve checked out all the repos I care about.
cd Repos
git clone [[email protected]](/cdn-cgi/l/email-protection):phildini/batavia.git
This will clone the batavia repo into a folder named batavia in my Repos directory. How did I know what the URL to clone was? Unfortunately, GitHub just changed their layout, so it’s a bit more hidden than it used to be.
Now we have the code checked out to our local machine. To start work, I first make a branch to hold my changes, something like:
git checkout -b fix-class-types
I make some changes, then make a commit with my changes.
git commit -av
The -a flag will add all unstaged files to the commit, and the -v flag will show a diff in my editor, which will open to let me create the commit message. It’s a great way to review all your changes before you’ve committed them.
With a commit ready, I will first pull anything that has changed from the original repo into my fork, to make sure there are no merge conflicts.
But wait! When we forked the repo, we made a copy completely separate from the original, and cloned from that. How do we get changes from the official repo?
The answer is through setting up an additional remote server entry.
If I run:
git remote -v
I see:
origin  [[email protected]](/cdn-cgi/l/email-protection):phildini/batavia.git (fetch)
origin  [[email protected]](/cdn-cgi/l/email-protection):phildini/batavia.git (push)
Which is what I would expect — I am pulling from my fork and pushing to my fork. But I can set up another remote that lets me get the upstream changes and pull them into my local repo.
git remote add upstream [[email protected]](/cdn-cgi/l/email-protection):pybee/batavia
Now when I run:
git remote -v
I see:
origin  [[email protected]](/cdn-cgi/l/email-protection):phildini/batavia.git (fetch)
origin  [[email protected]](/cdn-cgi/l/email-protection):phildini/batavia.git (push)
upstream    [[email protected]](/cdn-cgi/l/email-protection):pybee/batavia.git (fetch)
upstream    [[email protected]](/cdn-cgi/l/email-protection):pybee/batavia.git (push)
So I can do the following:
git checkout master
git pull upstream master --rebase
git push origin master --force
git checkout fix-class-types
git rebase master
These commands will:
- Check out the master branch
- Pull changes from the original repository into my master branch
- Update the master branch of my fork of the repo on GitHub.
- Checkout the branch I’m working on
- Pull any new changes from master into the branch I’m working on, through rebasing.
Now that I’m sure my local branch has the most recent changes from the original, I push the branch to my fork on github:
git push origin fix-class-types
With my branch all ready to go, I navigate to https://github.com/pybee/batavia, and GitHub helpfully prompts me to create a pull request. Which I do, remembering to create a helpful message and follow the contributing guidelines for the repo.
That’s the basic flow, let’s answer some questions.
Why do you make a branch in your fork, rather than make the patch on your master branch?
- GitHub pull requests are a little funny. From the moment you make a PR against a repo, any subsequent commits you make to that branch in your fork will get added to the PR. If I did my work on my master, submitted a PR, then started work on something else, any commits I pushed to my fork would end up in the PR. Creating a branch in my fork for every patch I’m working on keeps things clean.
Why did you force push to your master? Isn’t force pushing bad?
- Force pushing can be very bad, but mainly because it messes up other collaborator’s histories, and can cause weird side effects, like losing commits. On my fork of a repo, there should be no collaborators but me, so I feel safe force pushing. You’ll often need to force push upstream changes to your repo, because the commit pointers will be out of sync.
What if you need to update your PR?
- I follow a similar process, pulling changes from upstream to make sure I didn’t miss anything, and then pushing to the same branch again. GitHub takes care of the rest.
What about repos where you are a Core Contributor or have the commit bit?
- Even when I’m a Core Contributor to a repo, I still keep my fork around and make changes through PRs, for a few reasons. One, it forces me to stay in touch with the contributor workflow, and feel the pain of any breaking changes. Two, another Core Contributor should still be reviewing my PRs, and those are a bit cleaner if they’re coming from my repo (as compared to a branch on the main repo). Three, it reduces my fear of having a finger slip and committing something to the original repo that I didn’t intend.
That’s a good overview of my workflow for Open Source projects. I’m happy to explain anything that seemed unclear in the comments, and I hope this gives you ideas on how to make your own contribution workflow easier!
open-source
git
June 5, 2016
Tips for Becoming a Core Contributor
During the PyCon 2016 Sprints, I was made a Core Contributor to the BeeWare project, and was given the ‘commit bit’ on Batavia, an implementation of the Python virtual machine written in Javascript. A friend of mine who works with the PDX PyLadies and regularly encourages people to contribute to Open Source saw this, and asked that I write a blog post on becoming a Core Contributor to Open Source projects.
It’s true that, for many projects, how you become a Core Contributor can seem mysterious. It often seems unclear what a Core Contributor even does, and it doesn’t help that each Open Source project has a slightly different definition of the responsibilities of a Core Contributor.
So this deliberately isn’t a “How to Become a Core Contributor” guide. It would be impossible to write such a guide and be definitive. This is me trying to reverse engineer how I became a Core Contributor on BeeWare and then extracting out things I think are good behaviors for getting to that stage.
How I Became a Core Contributor to BeeWare:
Met Russell Keith-Magee at DjangoCon EU 2016, where he spoke about BeeWare and Batavia.
Chatted with Russell about BeeWare, sprinted some on Batavia at DjangoCon EU 2016.
Saw Russell and Katie McLaughlin at PyCon 2016, chatted more about BeeWare with both of them, joined the BeeWare sprint.
Recognized that BeeWare had some needs I could fill, namely helping onboard new people and reviewing Pull Requests.
Asked Russell for, and received, the ‘commit bit’ on the Batavia project so I could help review and merge PRs.
Tips I Can Give Based on My Experience:
Be excited about the project and the project’s future. I think the whole BeeWare suite has amazing potential for pushing Python to limits it hasn’t really reached before, and I want to see it succeed. A Core Contributor is a caretaker of a project’s future, and should be excited about what the future holds for project.
Be active in the community. Go to conferences and meetups when you can, join the mailing lists and IRC channels, follow the project and the project maintainers on Twitter. I met Russell and Katie at a conference, then kept in touch via various IRC and twitter channels, then hung out with them again at another conference. Along the way, I was tracking BeeWare and helping where I could.
Be friendly with the existing project maintainers and Core Contributors. It’s less likely I would be a Core Contributor if I wasn’t friends with Russell and Katie, but the way we all became friends was by being active in the community around Python, Django, and BeeWare. One way to figure out if you want to be a Core Contributor on a project is to see which projects and project maintainers you gravitate towards at meetups and conferences. If there’s a personality match, you’re more likely to have a good time. If you find yourself getting frustrated with the existing Core Contributors that’s probably a sign you’ll be more frustrated than happy as a Core Contributor to that project. It’s totally fine to walk away, or find other ways to contribute.
Focus on unblocking others. I still make individual code contributions to BeeWare projects, but I prioritize reviewing and merging pull requests, and helping out others in the community. From what I’ve seen, a Core Contributor’s time is mainly one of: Triaging issues in the issue tracker, reviewing patches or pull requests, and helping others. It’s only when everyone else is unblocked that I start looking at my own code contributions.
Have fun. I asked to become a Core Contributor to BeeWare because I enjoy the community, enjoy Russell’s philosophy on bringing on newcomers, and think the project itself is really neat. If you’re having fun, it’s obvious, and most Core Contributors want to promote the people who are on fire for a project.
My hope is that I have made becoming a Core Contributor to an Open Source project seem achievable. It is completely achievable, no matter your current skill level. There’s a lot more detail I didn’t cover here, and I can’t promise that if you do all these things you’ll become a Core Contributor, even on the BeeWare project. When you ask to become a Core Contributor to a project, the existing project maintainers are evaluating all kinds of things, like how active you are, how well you might mesh with the existing team, and what existing contributions you’ve made to the project and the community. It might not be a great fit, but it doesn’t mean you’re not a great person.
What I can say is that being a Core Contributor is work, hard work, but incredibly rewarding. Seeing someone make their first contribution, and helping shepherd that contribution to acceptance, is more rewarding for me than making individual contributions. Seeing a project grow, seeing the community grow around a project, makes the work worth it.
If you want have questions about my experience, or about contributing to Open Source in general, I’m happy to answer questions in the comments, or on twitter @phildini, or email [[email protected]]](mailto:[email protected]).
advice
python
open-source
June 4, 2016
Thoughts on the PSF, Introduction
The Python Software Foundation (PSF) is the non-profit that owns python.org, helps run PyPI, and makes sure PyCon happens. This is the introduction to a series of posts that will discuss some challenges that face the PSF and community as a whole, as well as some suggested solutions.
The big idea underlying all the little ideas in the following posts is this: The Python community is a unique and incredible community, and it is a community that I want to see grow and improve.
Python is full of welcoming, caring people, and that the Python community has shown over and over that it is not content to rest with any past good deeds, but is continually pushing to be more welcoming and more diverse. It was an incredibly powerful symbol to me that I spoke with multiple people at PyCon who don’t currently use Python for their jobs, but come to PyCon to be a part of the community. When I find people who want to get into programming, I point them at Python partially because I think the language is more beginner-friendly than most, but mostly because I know the community is there to support them.
The only qualification I claim for this series is caring deeply about this incredible community. If you want to learn more about my background, check out the about page. The ideas that I’m going to be presenting are a combination of my own thoughts, and conversations I’ve had at various conferences, and in IRC channels, and on mailing lists. I’m not claiming to be most qualified to speak on these things.
I have no real desire to critique the past. My goal is to start a conversation about the PSF’s future, a future which hopefully sees the PSF taking an even bigger role in supporting the community. To that end, there’s three things that I think we should be talking about, which I’ll discuss over the next three posts.
- Strengthening the Python ecosystem
- Encouraging new adoption of Python and new Python community members
- Supporting the existing Python community
If you are inspired to start these conversations, comments will be open on these posts, although I will be moderating heavily against anything the devolves into attacks. Assume the the PyCon Code of Conduct applies. I would be thrilled if these posts started discussion on the official PSF mailing lists, or in local user groups, or among your friends.
In the upcoming post, I’ll talk about challenges that face the Python ecosystem. I’ll talk about support and maintenance of the Python Package Index, why it should matter tremendously to the Python community, and what the community and the PSF could be doing to better support PyPI and package maintainers. Sign up for our mailing list to hear about the next post when it’s published.
python
psf
April 8, 2016
Using Django Channels as an Email Sending Queue
Channels is a project by led Andrew Godwin to bring native asynchronous processing to Django. Most of the tutorials for integrating Channels into a Django project focus on Channels’ ability to let Django “speak WebSockets”, but Channels has enormous potential as an async task runner. Channels could replace Celery or RQ for most projects, and do so in a way that feels more native.
To demonstrate this, let’s use Channels to add non-blocking email sending to a Django project. We’re going to add email invitations to a pre-existing project, and then send those invitations through Channels.
First, we’ll need an invitation model. This isn’t strictly necessary, as you could instead pass the right properties through Channels itself, but having an entry in the database provides a number of benefits, like using the Django admin to keep track of what invitations have been sent.
from django.db import models
from django.contrib.auth.models import User


class Invitation(models.Model):

    email = models.EmailField()
    sent = models.DateTimeField(null=True)
    sender = models.ForeignKey(User)
    key = models.CharField(max_length=32, unique=True)

    def __str__(self):
        return "{} invited {}".format(self.sender, self.email)

We create these invitations using a ModelForm.

from django import forms
from django.utils.crypto import get_random_string

from .models import Invitation


class InvitationForm(forms.ModelForm):

    class Meta:
        model = Invitation
        fields = ['email']

    def save(self, *args, **kwargs):
        self.instance.key = get_random_string(32).lower()
        return super(InvitationForm, self).save(*args, **kwargs)
Connecting this form to a view is left as an exercise to the reader. What we’d like to have happen now is for the invitation to be sent in the background as soon as it’s created. Which means we need to install Channels.
pip install channels
We’re going to be using Redis as a message carrier, also called a layer in Channels-world, between our main web process and the Channels worker processes. So we also need the appropriate Redis library.
pip install asgi-redis
Redis is the preferred Channels layer and the one we’re going to use for our setup. (The Channels team has also provided an in-memory layer and a database layer, but use of the database layer is strongly discouraged.) If we don’t have Redis installed in our development environment, we’ll need instructions for installing Redis on our development OS. (This possibly means googling “install redis {OUR OS NAME}”.) If we’re on a Debian/Linux-based system, this will be something like:
apt-get install redis-server
If we’re on a Mac, we’re going to use Homebrew, then install Redis through Homebrew:
brew install redis
The rest of this tutorial is going to assume we have Redis installed and running in our development environment.
With Channels, redis, and asgi-redis installed, we can start adding Channels to our project. In our project’s settings.py, add ‘channels’ to INSTALLED_APPS and add the channels configuration block.
INSTALLED_APPS = (
    ...,
    'channels',
)

CHANNEL_LAYERS = {
    "default": {
        "BACKEND": "asgi_redis.RedisChannelLayer",
        "CONFIG": {
            "hosts": [os.environ.get('REDIS_URL', 'redis://localhost:6379')],
        },
        "ROUTING": "myproject.routing.channel_routing",
    },
}
Let’s look at the CHANNEL_LAYERS block. If it looks like Django’s database settings, that’s not an accident. Like we have a default database defined elsewhere in our settings, here we’re defining a default Channels configuration. Our configuration uses the Redis backend, specifies the url of the Redis server, and points at a routing configuration. The routing configuration works like our project’s urls.py. (We’re also assuming our project is called ‘myproject’, you should replace that with your project’s actual package name)
Since we’re just using Channels to send email in the background, our routing.py is going to be pretty short.
from channels.routing import route

from .consumers import send_invite

channel_routing = [
    route('send-invite',send_invite),
]
Hopefully this structure looks somewhat like how we define URLs. What we’re saying here is that we have one route, ‘send-invite’, and what we receive on that channel should be consumed by the ‘send_invite’ consumer in our invitations app. The consumers.py file in our invitations app is similar to a views.py in a standard Django app, and it’s where we’re going to handle the actual email sending.
import logging
from django.contrib.sites.models import Site
from django.core.mail import EmailMessage
from django.utils import timezone

from invitations.models import Invitation

logger = logging.getLogger('email')

def send_invite(message):
    try:
        invite = Invitation.objects.get(
            id=message.content.get('id'),
        )
    except Invitation.DoesNotExist:
        logger.error("Invitation to send not found")
        return

    subject = "You've been invited!"
    body = "Go to https://%s/invites/accept/%s/ to join!" % (
            Site.objects.get_current().domain,
            invite.key,
        )
    try:
        message = EmailMessage(
            subject=subject,
            body=body,
            from_email="Invites <[[email protected]](/cdn-cgi/l/email-protection)%s.com>" % Site.objects.get_current().domain,
            to=[invite.email,],
        )
        message.send()
        invite.sent = timezone.now()
        invite.save()
    except:
        logger.exception('Problem sending invite %s' % (invite.id))
Consumers consume messages from a given channel, and messages are wrapper objects around blocks of data. That data must reduce down to a JSON blob, so it can be stored in a Channels layer and passed around. In our case, the only data we’re using is the ID of the invite to send. We fetch the invite object from the database, build an email message based on that invite object, then try to send the email. If it’s successful, we set a ‘sent’ timestamp on the invite object. If it fails, we log an error.
The last piece to set in motion is sending a message to the ‘send-invite’ channel at the right time. To do this, we modify our InvitationForm
from django import forms
from django.utils.crypto import get_random_string

from channels import Channel

from .models import Invitation


class InvitationForm(forms.ModelForm):

    class Meta:
        model = Invitation
        fields = ['email']

    def save(self, *args, **kwargs):
        self.instance.key = get_random_string(32).lower()
        response = super(InvitationForm, self).save(*args, **kwargs)
        notification = {
            'id': self.instance.id,
        }
        Channel('send-invite').send(notification)
        return response
We import Channel from the channels package, and send a data blob on the ‘send-invite’ channel when our invite is saved.
Now we’re ready to test! Assuming we’ve wired the form up to a view, and set the correct email host settings in our settings.py, we can test sending an invite in the background of our app using Channels. The amazing thing about Channels in development is that we start our devserver normally, and, in my experience at least, It Just Works.
python manage.py runserver
Congratulations! We’ve added background tasks to our Django application, using Channels!
Now, I don’t believe something is done until it’s shipped, so let’s talk a bit about deployment. The Channels docs make a great start at covering this, but I use Heroku, so I’m adapting the excellent tutorial written by Jacob Kaplan-Moss for this project.
We start by creating an asgi.py, which lives in the same directory as the wsgi.py Django created for us.
import os
import channels.asgi

os.environ.setdefault("DJANGO_SETTINGS_MODULE", "myproject.settings")
channel_layer = channels.asgi.get_channel_layer()
(Again, remembering to replace “myproject” with the actual name of our package directory)
Then, we update our Procfile to include the main Channels process, running under Daphne, and a worker process.
web: daphne myproject.asgi:channel_layer --port $PORT --bind 0.0.0.0 -v2
worker: python manage.py runworker --settings=myproject.settings -v2
We can use Heroku’s free Redis hosting to get started, deploy our application, and enjoy sending email in the background without blocking our main app serving requests.
Hopefully this tutorial has inspired you to explore Channels’ background-task functionality, and think about getting your apps ready for when Channels lands in Django core. I think we’re heading towards a future where Django can do even more out-of-the-box, and I’m excited to see what we build!
Special thanks to Jacob Kaplan-Moss, Chris Clark, and Erich Blume for providing feedback and editing on this post.
tech
django
channels
October 19, 2015
Why Doesn’t the Django CSRF Cookie Default to ‘httponly’?
Recently, some questions asked by a friend prompted me to look deeper into how Django actually handles it’s CSRF protection, and something stuck out that I want to share.
As a refresher, Cross-Site Request Forgery (CSRF) is a vulnerability in web applications where the server will accept state-changing requests without validating they came from the right client. If you have example.com/user/delete, where normally a user would fill out a form to delete that account, and you’re not checking for CSRF, potentially any site the user visits could delete the account on your site.
Django, that marvelous framework for perfectionists with a deadline, does some things out-of-the-box to try and defend you from CSRF attacks. It comes default-configured with the CSRF middleware active in the middleware stack, and this is where most of the magic happens.
The middleware works like so: When it gets a request, it tries to find a csrf_token in the request’s cookies (all cookies the browser knows about for a URL are sent with every request to that URL, and you can read about some interesting side-effects of that here: Cookies Can Be Costly On CDNs). If it finds a token in the cookie, and the request is a POST request, it looks for a matching token in the request’s POST data. If it finds both tokens, and they match, hooray! The middleware approves the request, and the request marches forward. In all other cases, the middleware rejects the request, and an error is returned.
The CSRF middleware also modifies the response on its way out, in order to do one important thing: set the cookie with the CSRF token to read. It’s here that I noticed something interesting, something that struck me as curious: The CSRF token doesn’t default to ‘httponly’.
When a site sets a cookie in the browser, it can choose to set an ‘httponly’ property on that cookie, meaning the cookie can only be read by the server, and not by anything in the browser (like, say, JavaScript). When I first read this, I thought this was weird, and possibly a mistake. Not setting the CSRF token ‘httponly’ means that anyone who can run JS on your pages could steal and modify the CSRF cookie, rendering its protection meaningless.
Another way to read what I just wrote would be: “If my site is vulnerable to Cross-Site Scripting (XSS) attacks, then they can break my CSRF protection!” This phrasing highlights a bit more why what I just said is funny: If your site is vulnerable to an XSS attack, that’s probably game over, and worrying about the CSRF protection is akin to shutting the barn door after the horse has been stolen.
Still, if the CSRF cookie defaulted to ‘httponly’, and you discovered your site had an XSS, you might breathe a little easier knowing that bad state-changing requests had a harder time getting through. (Neglecting other ways the cookie could be broken in an XSS attack, like cookie jar overflow). I was talking to Asheesh Laroia about this, and he called this the “belt-and-suspenders” approach to securing this facet of your web application. He’s not wrong, but I was still curious why Django, which ships with pretty incredible security out-of-the-box, didn’t set the default to ‘httponly’.
We don’t know the answer for sure (and I would love to have someone who knows give their thoughts in the comments!), but the best answer we came up with is: AJAX requests.
The modern web is composed less-and-less of static pages. Increasingly, we’re seeing rich client-side apps, built in JavaScript and HTML, with simple-yet-strong backends fielding requests from those client-side apps . In order for state-changing AJAX requests to get the same CSRF protection that forms on the page get, they need access to the CSRF token in the cookie.
It’s worth noting that we’re not certain about this, and the Django git history isn’t super clear on an answer. There is a setting you can adjust to make your CSRF cookie ‘httponly’, and it’s probably good to set that to ‘True’, if you’re certain your site will never-ever need CSRF protection on AJAX requests.
Thanks for reading, let me know what you think in the comments!
Update (2015-10-19, 10:28 AM): Reader Kevin Stone left a comment with one implementation of what we’re talking about:
$.ajaxSetup({
    headers: {
         'X-CSRFToken': $.cookie('csrftoken')
    }
}
Django will also accept CSRF tokens in the header (‘X-CSRFToken’), so this is a great example.
Also! Check out the comment left by Andrew Godwin for confirmation of our guesses.
tech
django
 phildini.dev